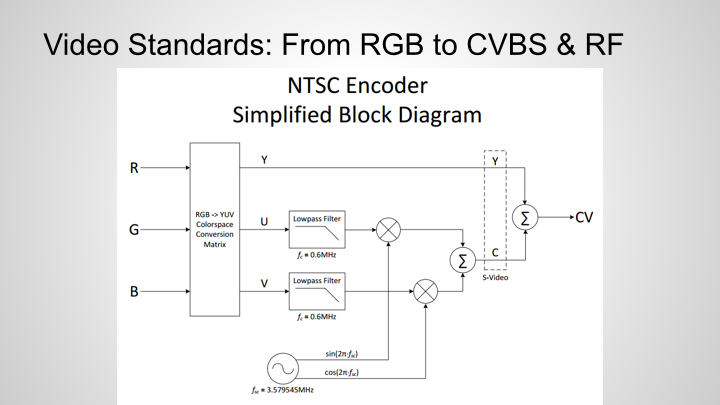
Welcome back to our technical series in blog posts. If you can bear with some coding details, the results of this are really cool. So let's jump into it.
Introduction
Back in the CRT days, most content was sent to the TV in 480i (interlaced). This meant that first the even rows were drawn top to bottom, and then the CRT gun would return to the top and fill in the odd rows on the next pass. More on that here. As you probably know, almost all SNES games play in a video mode that is typically referred to as "240p". This meant drawing picture on the even rows and leaving the odd rows black. This trickery is what allowed the full screen height to be refreshed at a rate of 60 times per second instead of 30 times per second (480i), and produces the well-known "scan line" effect.
There are a couple reasons we'd like to be able to trick games into running in 480i instead 240p. Not included in those reasons is actually playing the game, since it will look terrible. Perhaps the most important reason to us is that it could help us with debugging issues customers might run into when using our cables. Content that is 480i will almost always result in a picture on modern HDTVs, whereas 240p sometimes is not compatible. If a customer happens to have a Super Mario World and a Game Genie, it would be nice to be able to send the TV 480i content from the SNES to see if the problem is with the cable or with the TV. You may have your own interesting reason for using this that we haven't thought of. Also, it's just cool.
In addition to video test cartridges (240p Test Suite or HDRV Factory Test Software), there is one commercial SNES game (R.P.M. Racing) that actually uses 480i instead of 240p. What these examples suggest is that software can be written to tell the console whether to output video in either 480i or 240p. This wiki page is a great place to start whenever you want to learn anything about SNES development. If you dig into the Registers page, you'll find that register $2133 is the SETINI - Screen Mode/Video Select register (Note: $ before a number means it's in hexadecimal). This section is actually quite dense for an 8-bit register, but we can skip most of it and head to the part relevant to this discussion, which is the least significant bit (i.e. b0, or the bit furthest to the right). When this bit is set to 0, the SNES will output 240p video. When it is set to 1, the SNES will output 480i video. Simple enough. So how do we exploit this?
Our plan of attack looks like this: take a Super Mario World (chosen because of how common this game is) ROM, run it through a debugging utility that parses the assembly/hex code as it runs, find any location that sets register $2133, alter the code to set b0 of that register to 1 instead of 0. (Note: HD Retrovision LLC does not condone any illegal use of ROMs and emulation.) The rest of this article explains how we hacked a Super Mario World ROM into displaying in 480i, got it to work on real hardware via an EverDrive, and then finally created a set of Game Genie codes that allow us to get an actual Super Mario World cart to play in 480i as well.
ROM Hacking
We started by dumping the ROM from our Super Mario World cartridge using the Retrode. From there, the first tool that we used to accomplish this task is Geiger's SNES 9x Debugger. This is a great tool that allows you to do a few things that are very useful: step through code line by line, see hex side by side with 65816 Assembly, set breakpoints on the read/write/execute of specific registers, and even manually edit the hex if you want to. It's got more functionality than that, but those are the key ones for our purposes. In the screenshot below, you'll see that I used the tool to set a breakpoint at register $2133, stepped through several subsequent lines of code, and then eventually pressed "Run" again (at which point it stopped the next time it hit $2133).
Geiger's SNES 9x Debugger
It takes a bit of playing around, but you can eventually figure out that what the Super Mario World coders did was have a block of code that they called as a function every time the game turns on, or a new level starts, or you return to the map screen. That block of code goes through and sets a bunch of important registers, including $2133. In this case they ran STZ $2133, which translates to "store zero in register $2133." This ends up being quite useful for us, because it means we only have to muck around with the code in one place and get register $2133 to look like "00000001" instead of "00000000".
We could go directly to editing hex codes at this point, but that requires some more expert level thinking. More on that later. For proof of concept, we wrote some simple assembly code that we could insert into the ROM to accomplish what we need. At this point, it is important to understand that you can't simply just go throwing whatever code you want anywhere you want to do it. The code is laid out at addresses in such a way that it is expecting certain pieces of code to be in certain places. If you try to overwrite 3 bytes of code with 4 bytes, everything will break.
Here's a more concrete example: Starting at address $008A79 on the ROM, the next 3 bytes of hex look like 9C 33 21, which translates to STZ $2133 in assembly. We can't just go in and overwrite this with a LDA #$01 (load value 1 into accumulator) and STA $2133 (store accumulator value into $2133), since those together require 5 bytes (A9 01 8D 33 21) and not the 3 bytes used by the original code. If we did that, we'd either be inserting and shifting all of the code 2 bytes down, or overwriting whatever comes after STZ $2133. No good.
Unused space on the Super Mario World ROM
Instead, what we can do is jump to a subroutine at a different address (way out in empty space that isn't being used), run some code there, and then hop back. The address shown in the image above has a bunch of unused space, so we'll put it there. What we want to do is replace STZ $2133 with JSR $FFA0 (jump to a subroutine at $FFA0) which uses the same amount of space. Then at $FFA0 we'll insert our code and then return. Below is what that code looks like.
A couple quick notes: org is telling the assembler (the thing that turns words to code the SNES can understand) where we want to overwrite, and instead of directly jumping to an address we're just using a name (InterlaceBit) for the function, which the assembler will simply translate for us. RTS will return us out of the subroutine back to the place in code from where we jumped to this subroutine. How can we inject this code into our ROM? Well, we're off to another tool. This time we'll be using xkas. We put our patch1.asm and the original smw.smc file into a folder with that utility and run xkas patch1.asm smw.smc on the command line and we're done! To verify the patch has been written and is actually setting the interlace bit properly, we can use another utility called NO$SNS (I used v1.5 since Chrome thinks v1.6 is a virus) that gives us some visibility into various registers. Below is an image of the relevant section confirming our interlace bit has indeed been set.
NO$SNS I/O Map
Looks good, so let's write this ROM to an SD Card and go use it on an EverDrive to see if it will work on real hardware!
Game Genie Codes
The work in the previous section is important in that it proved that real hardware can indeed support this type of hack. However, it would be useful if we could accomplish this with a set of Game Genie codes instead. Unfortunately, this adds some constraints. Each Game Genie code can only change one byte of the ROM, and you are limited to a maximum of 5 codes. Just overwriting STZ $2133 with JMP $FFA0 would take three codes, and that's before we've written that whole subroutine. We're going to have to be more efficient, which suggests we should look for places where the developers were inefficient. If you're an assembly wiz, you might have noticed one such place back in the previous section where we stepped through some lines of code.
The developers have given us a gift in that LDA #$00 followed by STA $210B is equivalent to STZ $210B. This makes a possible patch very efficient: we'll change line $008A79 to STZ $210B, and use the inefficient code to instead execute LDA #$01 and STA $2133. Using the format address : new_value, we want to make the following changes.
008A7A : 0B (STZ $2133 -> STZ $210B)
008A8F : 01 (LDA #$00 -> LDA #$01)
008A91 : 33 (STA$210B -> STA $2133)
Now we just need to map these changes to Game Genie codes. There are several resources on the internet that describe the algorithm that converts these hexadecimal changes into game genie codes. It's interesting to learn, but incredibly tedious to perform by hand (not to mention it is incredibly easy to make mistakes!). Instead, I recommend using the Game Genie Code Converter. Here's what happens when you plug in that first code:
Game Genie Code Converter
If you repeat this process for the other two lines, you'll get the three Game Genie codes that will let you run Super Mario World in 480i (**see note at end**). They are:
D865-6464
DF66-67A4
776B-6D04
Let's try it out!
Wrap Up
Unfortunately, this is not an easily repeatable task that you can generalize to all games. We've come up with Game Genie codes for a few other games, but it ends up being quite difficult for most of them. We will be posting whatever codes we're able to find on our Free Stuff section. It's also worth reiterating that this is not really meant for using to actually play games, unless you like an ugly deinterlaced look. Additionally, to properly utilize 480i, you need to set the SNES's BG Mode to 5 or 6 to get 448 lines (R.P.M. Racing does this). Otherwise it just throws the 224 lines onto the separate fields which are spatially offset by 1 line and causes the jumpiness. Attempts to perform an additional hack for BG Mode 5 or 6 have been unsuccessful thus far.
**NOTE FROM STE** I am aware of two revisions of the SNES Game Genie. You can physically see which one you have only by cracking it open to read the version number on the circuit board. Alternatively, you can determine which version you have by how the code entering screen looks on boot: If the gold dashes are pre-populated on the codes, it is v1.0. If the gold dash only appears once you've entered in the fourth digit of a code, it is v2.0.
Depending on which revision of Game Genie you have, it may or may not work with your SNES revision. Based on testing, I reached a conclusion on compatibility between the v1.0 & v2.0 revisions. To make it easier, I'll break the various SNES consoles revisions into 3 families.
Family 1: SHVC-CPU-01, SNS-CPU-GPM-01, SNS-CPU-GPM-02
Family 2: SNS-CPU-RGB-01, SNS-CPU-RGB-02, SNS-CPU-APU-01
Family 3: SNS-CPU-1CHIP-01, SNS-CPU-1CHIP-02, SNS-CPU-1CHIP-03, SNN-CPU-01 (mini)
With that in mind, Game Genie v1.0 only works with Family 1. Game Genie v2.0 works fully with Family 1 and 2, but only the top and bottom code lines work on Family 3 (the middle three lines are non-functional).