You may have noticed that we published Game Genie codes for Genesis along with the release of our last post. Here's how we did it.
Introduction
This blog post is a follow-up to our previous blog post, in which we demonstrated the method we used to derive Game Genie codes to get Super Mario World to run in 480i on the SNES. Here we will demonstrate the method used to derive the 480i Game Genie codes for the Sega Genesis, which is different enough that it deserves a separate treatment. We've already posted the Game Genie codes we've come up with thus far over on our Free Stuff page, so you can jump right to that if the technical details are of no interest. (Reminder: This is not intended for game play!) For the rest of you, let's go do some coding!
The Sega Genesis VDP
In our 480i SNES post, we showed how setting the least significant bit (b0) of register $2133 to have a value of 1 would tell the SNES to use its 480i mode instead of its 240p mode. The way this is accomplished on Sega Genesis VDP (Video Display Processor) is different. On SNES, the CPU has direct access to the register that controls (among other things) the interlaced vs progressive setting. Therefore, those settings can be altered with a simple command, like LDA $2133. On Sega Genesis, the register that contains these settings is not accessible in the same way. Instead, it lives inside the VDP which you must communicate with through a dedicated control port that sits at address $C00004. The best resource we have found that talks about how the Sega Genesis VDP works can be found here.
The relevant register that we need to alter is $0C - Mode Register 4. To communicate to this register, we have to write a word (two bytes) to the control port. The first byte needs to be the register we wish to alter, with one change: the most significant (left most) bit must be switched to 1. For $0C (written as 0000 1100 in binary) our first byte in the word will be $8C (1000 1100). For the second byte in our word, we write the new value we wish to set for that register. In register $0C, b2 and b1 are the bits that relate to the interlace vs progressive setting. When b2=b1=0, the Genesis will operate in its typical 240p mode. When b2=0 and b1=1, the Genesis will operate in 480i mode similar to what we did with the SNES (**SEE NOTE AT END**). Finally, when b2=b1=1, the Genesis will operate in a different 480i mode, the scope of which is beyond this post (think Sonic 2 versus mode). The last combination, b2=1 and b1=0, is undefined and should not be used.
The second byte in our word will depend on what is already being written to that register, since we don't want to alter the other bits. We simply want to change b1 to take on a value of 1 while leaving b2 as 0. The proper way to do this would be to add some code that ORs the current value of the register with $02 (0000 0010 in binary), but that would be very difficult or impossible to accomplish in 5 Game Genie codes. Instead, in the next section we'll use a tool to inspect the value that register $0C takes on in the unaltered ROM, and use that knowledge to flip b1 of that value to one. Anecdotally, every single ROM I looked at while experimenting with this procedure had a value of $81 (1000 0001) in register $0C before I started altering it. Flipping b1 thus resulted in the new value of $83 (1000 0011). When this is the case, it makes the word that we want to write to $C00004 the following: $8C83.
The Method
Fortunately for the enterprising Game Genie code developer, development on the Genesis is a bit easier (despite the fact that ramping up on how everything worked was a little harder). For starters, one main tool covers almost everything we need to be able to do: Exodus. I used v2.0.1 for this demonstration, and while I found it to be quite buggy, I was able to get by.
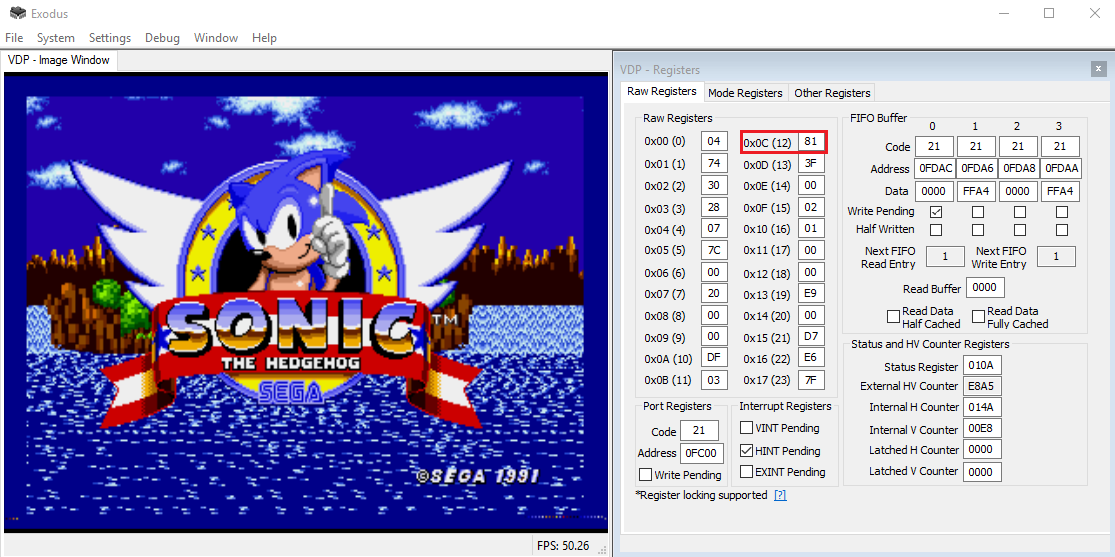
Exodus v2.0.1 with VDP Register window
After extracting the ROM from a cartridge using the Retrode, the first step we took was always to run the game to a startup screen, pause, and then open up the VDP Register monitoring utility from the Debug menu. This is where you can find out what value is currently sitting in register $0C (for Sonic the Hedgehog shown above, it is set to $81). This value is important for two reasons: (1) we know to look for $8C81 being written to $C00004 in the assembly, and (2) we use it to determine that $8C83 is the new value that we wish to write by flipping b1 from 0 to 1.
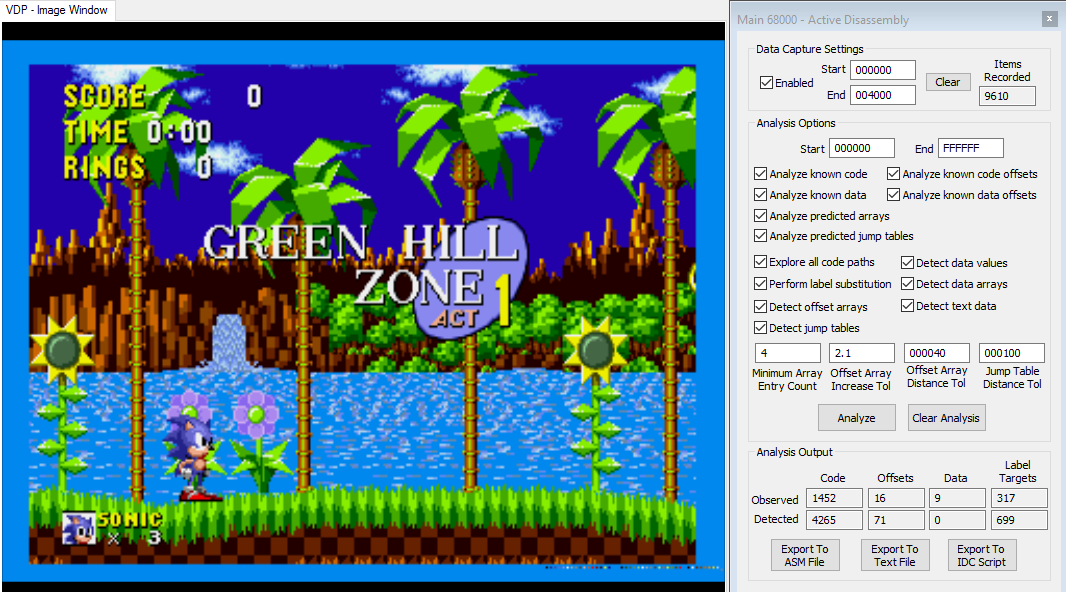
The next step is to use the Main 68000 Active Disassembly tool, also found in the Debug menu. As shown in the image above, we enabled data capture settings from $000000 to $004000 (this may need to be increased for some games). From there, simply reset the ROM and run the game to the first moment of actual game play. Once there, you can pause, press "Analyze" and output the result to an asm file. (Be patient! This takes some time and the file size is typically around 90MB.)

Now we have to deal with the trickiest part to this whole mess: finding where $8C81 is being written, and then overwrite it using the Game Genie. There are basically two scenarios to deal with. The first case, and the one Sonic the Hedgehog uses, is that the values $8C and $81 get plopped somewhere in memory and then read later on into $C00004. Using a decent text editor like Notepad++, you can open up the .asm file saved off in the previous step and start hunting. The search term I recommend looking for in this case is "$8C, $81". Once you've found all the instances of that - and for Sonic 1 there is only one - take special note of where it says something like "loc_000012A0:". This piece of information tells you where in the ROM that block of code begins. It's back to Exodus one last time to use the ROM editor to pin down where exactly $8C81 lives.

Starting from $012A0 on the ROM, we scan until we find $8C81 and then use our mouse to hover over the location. The tooltip that pops up tells us the address is $012B6. Just as in our previous post, we'll write the change we want to make in the format address : new value. The only difference is that for SNES a single Game Genie code overwrites a byte at a time, and for Genesis a single Game Genie code overwrites two bytes at a time. The only change we want to make for Sonic 1 is then 0012B6 : 8C83.

Game Genie Code Converter
Just like we did for SNES, we'll rely on the Game Genie Code Converter to do the hard crunching from hex code to Game Genie code. This returns the only code needed to get Sonic the Hedgehog to run in 480i mode:
TNKA-A3F0
Let's try it out on real hardware!
We have to look at a different game to encounter the other scenario that I've found. In X-Men, the value $8C81 is written to $C00004 in a single line of "immediate" assembly code (the # sign) rather than storing the $8C81 in a temporary memory location and writing the contents of that location to $C00004. After applying all the same techniques up to opening the file in Notepad++, a search for "$8C, $81" will fail. An alternative that works is to search for "#$8C81". One of the two locations it can be found on X-Men is shown in the image below.

From there we simply follow the same path of finding the exact locations using Exodus's ROM editor tool, and then rewriting the words at those locations to be $8C83 instead of $8C81.
Wrap Up
This post is intended to be useful for understanding the techniques used to derive 480i Game Genie codes for Sega Genesis, but it may not be complete. There may be other scenarios out there that I haven't come across, in which case the next steps I would take are (1) changing the search to look for "C00004" and trying to find relevant writes to the control port that way, and (2) expanding how much of the ROM you want to actively disassemble.
**NOTE FROM STE** The Sega Genesis 480i mode has a slightly non-standard vertical refresh rate, and therefore may cause some compatibility issues with displays that reject anything that isn't at exactly 59.94 Hz.